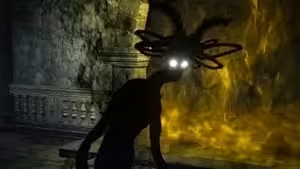
Cemetery Shade
| Location | |
| Black Knife CatacombsGrace | |
| CaelidRegion | |
| Caelid CatacombsGrace | |
| Liurnia Highway SouthGrace | |
| Liurnia of the LakesRegion | |
| Tombsward CatacombsGrace | |
| Weeping PeninsulaRegion | |
Drops | |
| Kindred of Rot Ashes | |
| Lhutel the Headless | |
| Twinsage Sorcerer Ashes | |
| Runes | |
| 6800 | |
| Description | |
Insect-ridden grave keepers. | |
| Notes | |
Tombsward CatacombsGrace.
Black Knife CatacombsGrace.
Caelid CatacombsGrace
Stance: 70.
Parryable: Yes
Is vulnerable to a critical hit after being stance broken or parried
Damage: Slash, Pierce
Inflicts: Hemorrhage
Negations (or Absorptions).
Standard: 10
Slash: 10
Strike: 10
Pierce: 35
Magic: 0
Fire: 0
Lightning: 0
Holy: -20
The negation numbers are the of your damage that gets blocked.
For example, if a negation is 60, 40 of that damage by that type will go through and 60 will be negated.
Bigger number less damage.
A negation of 100 means no damage goes through, and a negation of -100 mean the enemy takes 2x damage from that source.
0 means damage goes pretty much as is.
Resistances
Poison: Immune
Scarlet Rot: Immune
Hemorrhage: Immune
Frostbite: Immune
Sleep: Immune
Madness: Immune
The resistance numbers are the buildup amount to trigger it.
For example, if a resistance is 100 you must deal 100 points of the given buildup to trigger it.
Note that these go down over time, and increase each time the effect procs.
Cemetery Shade Boss Guide
Cemetery Shade Fight Strategy.
The Best Tips for Cemetery Shade:
Use Opaline Bubbletear before entering the boss arena to ensure you'll have time to to use your Spirit Calling Bell.
Use the Swift Glintstone Shard Spell to hit it, as it can easily dodge slower sorceries.
Bring Stanching Boluses to prevent Hemorrhage.
Melee Users
Blitz it Down: Cemetery Shade has extremely low health.
If you've got enough damage output and the vitality to survive a few hits, you'll probably win a fight where you just trade blows until one of you dies.
Defensive Maneuvers: If you want to play defensively, equip a shield with 100 physical negation.
Block its attacks and guard counter afterwards to get in damage and wear down its Stance.
You can also parry its attacks, but the timing is difficult since they come in rapid succession.
It can still inflict Hemorrhage through a shield, so be ready to consume a Stanching Bolus.
Magic and Ranged Users
Quick Attacks: Cemetery Shade tends to teleport quickly around the arena, making it hard to hit if your cast time is slow or if you're using a ranged weapon skill like the Mighty Shot.
Spells that like Swift Glintstone Shard that can be cast quickly are helpful, as long as you avoid its projectile attacks.
Greatbows Barrage: A hit from a Greatbow will knock Cemetery Shade down if it hits.
You can ensure that it does by firing right after it teleports.
It'll take enough time getting back up for you to nock another arrow and repeat the process.
Cemetery Shade Attacks & Counters
Attack
Description
Counter
Teleport
Vanishes and reappears elsewhere in the arena.
Used either to escape when being attacked or to close distance and reposition before attacking
When the shade teleports close to you, there's a brief period before it starts to attack when you can roll away or start guarding
Spit Trap
Blows a bubble above its head, then shoots it at you.
If it hits, you're unable to move or attack for 5 seconds
Roll once the bubble is a little bigger than the Shade's head
Spider Grab
Its head begins to glow and its spider legs wriggle as it brings it down to grab your head.
Only used after Spit Trap
Avoid getting hit by Spit Trap
Dual Stab
Draws back both blades with tips pointed downwards and stabs you with them
This attack's windup is difficult to distinguish from Furious Slashing, so the safest course of action is to get far away in case it does that.
If you're up for a little risk, it's usually safe to block or dodge this it will usually teleport afterwards, but often close enough that you can still hit it with an attack
Dual Slash
Slashes both of its blades in a wide arc from its left to its right.
Block or dodge to your right, then attack
One-Two Slash
Slashes once clockwise then again counterclockwise
Block both attacks and then guard counter, or roll backwards
Overhead Slam
Slams both blades into the ground in front of it
Dodge or block, then attack back.
It's at its most vulnerable after this attack
Pincer Attack
Spreads its blades wide, then closes them in on both sides at once
Because the attack comes from the sides this is a dangerous move to block.
Rolling forward is more reliable
Spinning Swings
Slashes once from its right to its left, pauses for a moment, then slashes in the opposite direction four times in quick succession while moving forward.
The long pause after the first strike gives you a chance to run away or try to stagger it out of the attack.
Note that a single dodge won't get you fully out of range of its follow-up swings.
Furious Slashing
Draws back both blades with tips pointed upwards, slashes twice, pauses briefly, slashes five more times, then finishes with an Overhead Slam
Once you see it pull back its blade, roll or run away and prepare to punish the Overhead Slam.
Blocking this isn't advisable, since it will still inflict a substantial amount of Hemorrhage
: Attack can be parried
Cemetery Shade Notes & Other Trivia
Cemetery Shade Combo Chart
Cemetery Shade Tombsward CatacombsGrace.
image
Drops
2,200
Lhutel the Headless
HP
781 |