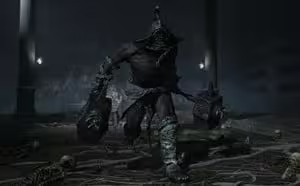
Grave Warden Duelist
| Location | |
| Auriza Side TombGrace | |
| Capital OutskirtsRegion | |
| LimgraveRegion | |
| Murkwater CatacombsGrace | |
| Sainted Hero's GraveGrace | |
Drops | |
| Banished Knight Engvall Ashes | |
| Soldjars of Fortune Ashes | |
| Runes | |
| 15000 | |
| Description | |
Duelists who were exiled from the colosseum. | |
| Notes | |
Murkwater CatacombsGrace.
Auriza Side TombGrace
Stance: 65.
Parryable: Yes.
Is vulnerable to a critical hit after being stance broken or parried
Can be backstabbed
Damage: Standard, Strike
Negations (or Absorptions).
Standard: 0
Slash: -10
Strike: 0
Pierce: 0
Magic: 0
Fire: 0
Lightning: 0
Holy: 0
The negation numbers are the of your damage that gets blocked.
For example, if a negation is 60, 40 of that damage by that type will go through and 60 will be negated.
Bigger number less damage.
A negation of 100 means no damage goes through, and a negation of -100 mean the enemy takes 2x damage from that source.
0 means damage goes pretty much as is.
Grave Warden Duelist Boss Guide for
Grave Warden Duelist Fight Strategy.
The Best Tips for Grave Warden Duelist:
Kaiden Sellsword Ashes can make this fight a breeze
Melee Strategy
His hits deal a lot of Stamina damage, so make sure to dodge as well as blocking attacks.
Summons: The easiest way to defeat this boss is to summon Spirit Ash and lay into him when he's focused on your ally, but you will need to avoid his Chain Swing attack.
Guard Counters: A Greatshield will rebound most attacks, giving you a chance to guard counter.
His relatively low stance will give you plenty of chances to land critical hits.
Magic and Ranged Strategy
Kite: Keep your distance and draw him around the room.
Move while he's performing his combos and attack during his recovery periods.
During the second phase, he may sprint towards you until you're within his melee range.
If he does, wait for him to get close and dodge the attack to the right, then roll backwards to get some distance again.
Make sure you don't get stuck on the walls or columns
Attacks & Counters
Attack
Description
Counter
Hammer Swing
Swings his right or left hammer in various orientations
Roll away and prepare to dodge the rest of the combo
Hammer Slam
Slams one of his hammers into the ground
Roll around him to his left to avoid a Hammer Scrape and get in a hit or set up a backstab
Double Slam
Slams both hammers into the ground
Roll around him to his left and get in an attack or set up a backstab
Hammer Scrape
Scrapes a along the ground on his right
Stay to his left after a Jump Smash or Hammer Slam
Hammer Throw
Whips his hammers around its head and then throws them both forward
Run away while he's twirling his hammers this attack doesn't actually cover much range
Chain Swing
Swings its hammer in an arc in front of it.
The second swing in a combo sometimes has more range
Run backwards if you've got enough distance, or roll towards him so the second swing goes wide
Jump Smash
Leaps forward and slams both hammers into the ground
Roll diagonally forward to get behind him, then attack or set up a backstab.
Drumbeat Finisher
Raises both hammers above his head and slams them hammers on the ground one after the other a total of four times
Roll away and prepare to run back in and punish him once he's finished
Grab
Raises his right hand and crouches to the ground before lunging forward.
If it lands, he grabs the player by the head and throws them to the ground.
If you have time, you can just walk behind him and land a few attacks while he's grabbing air.
If you're caught by surprise, roll to the left or right
Braggart's Roar
Lets loose a furious roar, increasing his attack power and damage negation
Attack while he is busy performing this move.
: Attack can be parried
Grave Warden Duelist Notes & Other Trivia
Grave Warden Duelist Combo Chart
Grave Warden Duelist Murkwater CatacombsGrace.
Drops
1,700
Banished Knight Engvall Ashes
HP
2,190 |
