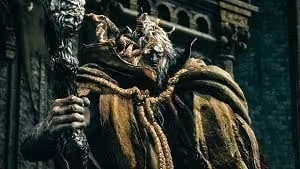
Margit, The Fell Omen
| Location | |
| LimgraveRegion | |
| StormhillLandmark | |
Drops | |
| Talisman Pouch | |
| Viridian Amber Medallion +1 | |
| Description | |
Someone must extinguish thy flame.
Let it be Margit the Fell | |
| Notes | |
Take the path north from Stormhill ShackGrace and turn left at the fork, curving back south up a hill full of Godrick Soldiers.
You'll need to either fight your way through these soldiers or run past them to reach the Castleward TunnelGrace Site of Grace, which is just in front of the boss door for Margit, the Fell Omen.
See also the non-boss variant in Capital OutskirtsRegion.
Health: 4,174 HP.
Defense: 103.
Stance: 80
Parryable: Yes, but 2 parries are required per stance break
Is vulnerable to a critical hit after being stance broken or parried
Damage: Standard, Strike, Pierce, Holy
Drops 12,000, Talisman Pouch (NG only)
Negations (or Absorptions).
Standard: 0
Slash: -10
Strike: 0
Pierce: 0
Magic: 0
Fire: 0
Lightning: 0
Holy: 40
The negation numbers are the of your damage that gets blocked.
For example, if a negation is 60, 40 of that damage by that type will go through and 60 will be negated.
Bigger number less damage.
A negation of 100 means no damage goes through, and a negation of -100 mean the enemy takes 2x damage from that source.
0 means damage goes pretty much as is.
Resistances
Poison: 316 / 414 / 704 / 1161
Scarlet Rot: 316 / 414 / 704 / 1161
Hemorrhage: 316 / 414 / 704 / 1161
Frostbite: 316 / 414 / 704 / 1161
Sleep: Immune
Madness: Immune
The resistance numbers are the buildup amount to trigger it.
For example, if a resistance is 100 you must deal 100 points of the given buildup to trigger it.
Note that these go down over time, and increase each time the effect procs.
The values after the / s indicate the increased resistances after each successive proc.
NG and Beyond.
NG
NG
NG 2
NG 3
NG 4
NG 5
NG 6
NG 7
HP
4,174
9,831
10,814
11,306
11,797
12,781
13,272
13,764
Defense
103
117
120
123
129
135
141
152
Runes
12,000
60,000
66,000
67,500
72,000
73,500
75,000
76,500
Resistances
Poison
316 / 414 / 704 / 1161
344 / 442 / 732 / 1189
349 / 447 / 737 / 1194
354 / 452 / 742 / 1199
359 / 457 / 747 / 1204
364 / 462 / 752 / 1209
369 / 467 / 757 / 1214
374 / 472 / 762 / 1219
Scarlet Rot
316 / 414 / 704 / 1161
344 / 442 / 732 / 1189
349 / 447 / 737 / 1194
354 / 452 / 742 / 1199
359 / 457 / 747 / 1204
364 / 462 / 752 / 1209
369 / 467 / 757 / 1214
374 / 472 / 762 / 1219
Hemorrhage
316 / 414 / 704 / 1161
344 / 442 / 732 / 1189
349 / 447 / 737 / 1194
354 / 452 / 742 / 1199
359 / 457 / 747 / 1204
364 / 462 / 752 / 1209
369 / 467 / 757 / 1214
374 / 472 / 762 / 1219
Frostbite
316 / 414 / 704 / 1161
344 / 442 / 732 / 1189
349 / 447 / 737 / 1194
354 / 452 / 742 / 1199
359 / 457 / 747 / 1204
364 / 462 / 752 / 1209
369 / 467 / 757 / 1214
374 / 472 / 762 / 1219
Sleep
Immune
Madness
Immune
Margit, the Fell Omen Boss Guide for
Video Guide for Margit, the Fell Omen Boss.
Margit, the Fell Omen Fight Strategy
The Best Tips for Margit, the Fell Omen:
Purchase Margit's Shackle from Patches to bind him to the ground, temporarily stunning him.
This allows you to get a few free hits.
This will not work once he reaches Phase 2.
Using the Lone Wolf Ashes can help distract Margit long enough to get some easy damage in with spells or melee attacks.
The Spirit Jellyfish can act as a great tanky distraction, and is available if you speak to Roderika in Stormhill.
Another good multi-summon Ashes are the Godrick Soldiers, found in the graveyard surrounded by Spirit Jellyfish in Stormhill.
Glintstone Stars works well in this fight if you can get enough distance to use them.
Glintstone Pebble can work fine as well, as it is cheap and reliable.
Wait for him to do his leaping plunge attack with his hammer, and roll through it towards him to get in some easy damage.
This is your best opening during this fight.
Ash of War: Barricade Shield can make this fight much easier for melee players, because it allows them to block and attack more easily, though his summoned weapons do not deal Physical Damage, so you still take chip damage.
Great boss to learn how to parry.
Do note that it takes two parries to put him in a state where he can be riposted.
The majority of his staff attacks are parryable, but his magic weapon attacks are not.
This simplifies the fight a lot, as most of his attack sequences open with the staff.
Melee Strategy
Margit is a tough fight for melee users due to his aggressive nature and long combos with extended wind-ups, making it difficult to block all of his attacks.
You will need to dodge roll most of his moves, blocking only when necessary to conserve stamina for counterattacks.
Using the Lone Wolf Ashes can help you attack alongside the wolves, allowing you to break his stance and staggering him for a critical hit.
Keep up the pressure to trigger this more often.
Having high HP can help you trade hits more effectively.
Margit deals both Physical and Holy damage (indicated by his yellow glowing weapon effects), so wear armor and talismans that protect against both.
Avoid armor that results in a heavy roll.
Bait his attacks and only strike when you are sure that he has stopped attacking, as he can extend certain combos if you overextend.
You will likely trade damage occasionally, but that's okay.
Watch out for his leaping hammer attack dodge roll towards him and land a hit or two during his landing animation.
Avoid getting greedy; you can usually only attack once without taking damage, and doing so too often will result in you running out of consumables.
Consider slotting Ash of War: Bloody Slash for its quick, long-range burst damage, though it does cost some health.
You should already have this Ash of War if you have completed Kenneth Haight's questline.
Magic and Ranged Strategy
The strategy for Magic and Ranged users is somewhat easier, though Shortbow users may have a harder time due to lower damage and lack of a Shield.
Margit can either be extremely aggressive or not, and there seems to be no in-between.
If you can keep separation from him until he goes into a not aggressive phase, then you can attack him at range fairly easily for a short time, getting some free damage.
Just make sure to watch out for his Blade Toss attack, so you don't get hit.
You could try using Glintstone Pebble or Glintstone Stars, as these are incredibly effective and efficient.
Their cast times are in the mid-range, so be warned that you'll have to have proper spacing to use them.
Additionally, it's not a bad idea to use a Shield in your off-hand to block in case of emergencies or after you cast, in case you cut it too close.
You can use the Lone Wolf Ashes to create a distraction that can allow you to range him down in less than a minute, if you play it right.
Wait for the wolves to gain his attention, then unleash spell after spell, making sure to pause when you gain aggro.
This gives the wolves time to acquire it once again before continuing your barrage.
Margit Notes & Other Trivia
Voice Actor: Anthony Howell
The reason for Margit's appearance in Stormveil is likely due to the fact that Godrick is considered the weakest demigod and would be the first target of those seeking the Great Runes.
Margit will later appear in the Capital OutskirtsRegion of LeyndellRegion, posing as a regular Commoner.
He will use the exact same moveset, along with the Phase 2 transition.
He drops the Viridan Amber Medallion 1 upon defeat.
Defeating Margit's true form will also prevent him from appearing at Stormveil CastleDungeon.
He will also drop the Talisman Pouch.
Oddly enough, defeating his true form will not stop the Capital OutskirtsRegion encounter from occurring.
The spectral dagger he summons for his dagger throw and slash attacks is an Erdsteel Dagger, and for his hammer attacks, he uses a Giant-Crusher.
The straight sword he summons for some of his spinning combos is a Carian Knight's Sword.
Margit, being the first boss, is the 2nd most attempted boss in the game with 281 million attempts by players.
FAQ: How do you stun the First Boss
To help with your first encounter against Margit the Fell Omen, players may come back with Margit's Shackle.
This item, when used during one of Margit's boss fights, causes Margit to violently slam against the floor, inflicting no damage, but stunning him for a brief moment.
This effect will also interrupt anything Margit was doing at the time.
The effect of this item can only be activated twice during the boss fight and only during Margit's first phase.
Attempting to use the shackle otherwise will have the player go through the animation, but will have no effect whatsoever.
This item can be purchased from Patches for 5000 Runes in Murkwater CaveGrace.
After he becomes available as a merchant.
Or it can be purchased from the Twin Maiden Husks at the Roundtable HoldLandmark, after giving them Patches's Bell Bearing
If players still have difficulty facing this boss, players can consider using Spirit Ashes, or wielding Weapons with the Bleed effect on it to cause great damage.
Magic players can select mid ranged heavy attacks and take an aggressive approach to wear out his HP bar.
Definitely take advantage of his stunned period because this is when you can land the most amount of hits without risk of damage.
Immediately create some distance once the stun effect has worn off.
Attacks & Counters
Attack
Description
Counter
Staff Swing
Swings his staff in many directions with wind-ups ranging from fast to slow
This short ranged melee attack is easy to back away from and avoid.
You can often fit in an attack during the wind-up for the slower animations
Staff Stab
Stabs his staff directly forward
Roll to your left.
It's tempting to move to his right side, but this will allow him to combo directly into dagger slashes while his left side has no combos after this attack
Windup Attack
Pulls his staff behind his back, then slams it into the ground, if his target is close.
He will rushes forward if they are further away, spinning clockwise and slashing twice in front of him.
The windup is very long, so take advantage of it to get in a few hits.
In Phase 1 this will always end his combos if you dodge successfully, so you can get in a hit afterwards as well
Dagger Slash
Quickly slashes a spectral dagger in front of him.
Often happens when you're towards his left side.
Don't get too greedy when punishing a point in his combos that can transition to a Dagger Slash, since it comes out quickly.
You can avoid it by staying behind him
Dagger Throw
Throws a spectral dagger once or twice, usually when you're trying to heal.
May follow up with a lunging swing.
Roll when you see a dagger appear in his hands.
You can even dodge this just by running to the left or right
Dagger Retreat
Slashes once with a dagger, then jumps backwards and throws it
Dodge twice in quick succession
Tail Swipe
Swings his tail to hit you if you're behind him.
This has a small radius, so dodge back to avoid it easily
Unguarded
Slash
When the player's guard is broken, he slashes simultaneously with both his staff and a summoned sword.
It's near impossible to avoid this once it happens since you're already guard-broken, so try to avoid it by limiting how much you block and watching your stamina.
Leaping Stab
Leaps towards you, hovering in the air for a moment, then thrusting downward.
He hovers in the air long enough for you to walk out of range and land a few hits as he recovers.
Phase Change
Once his health goes below 65 , he summons a spectral hammer, placing it on his shoulder, swinging it in front of him while leaping high into the air, before slamming it down to the ground, creating a shockwave.
Move away once you see the hammer to avoid the initial swing, then roll once you see him begin to descend to avoid the slam.
Get in a few hits while he recovers
Phase 2
Hammer Slam
Raises his left leg, then smashes his spectral hammer down in front of him
Dodge forward.
This attack always ends his combos, so it's safe to land a few hits if you dodge safely
Hammer Strike
Summons a spectral hammer onto his shoulder, then spins around slashing first with his staff and then with his hammer
Dodge away and prepare to dodge more combo moves.
Only the cane part of this attack is parriable
Hammer Leap
Jumps high into the air and slams his hammer down, creating a shockwave.
Identical to the phase transition, but this can also happen without warning.
Dodge forward as you see him beginning to descend.
This attack always ends his combos, so get in a few hits if you dodge successfully
Weapon Combo
At this point, he can quickly switch out his weapons for a combo, using his staff, sword and hammer subsequently in one combo action.
Dodge back through these until the combo is over, since you won't be able to squeeze in any attacks for the moment.
Follow up with your own attack immediately after the combo is complete.
Sword Swing
Slices in front of him with his spectral sword
Roll away and prepare to dodge more combo moves
Sword Spin
Holds his spectral sword above his head, then spins around slashing first with his sword, then his staff, then sword, then his staff.
Since this attack covers a long range, it's a good idea to just try to run away.
Only the cane swings are parryable
: Attack can be parried
Dialogue
Introduction:
Foul Tarnished,
In search of the .
Emboldened by the flame of ambition.
Hrah
Someone must extinguish thy flame.
Let it be Margit the Fell
During Fight:
Defeating player:
Put these foolish ambitions to rest.
At 60 health:
Well, thou art of passing skill.
Warrior blood must truly run in thy veins, Tarnished.
After Fight:
I shall remember thee, Tarnished.
Smouldering with thy meagre flame.
Cower in Fear.
Of the Night.
The hands of the Fell Omen shall brook thee no quarter.
Later Encounter:
I see thee, little Tarnished.
Smouldering with thy wretched flame of ambition.
Margit, the Fell Omen Combo Chart
Margit, the Fell Omen Capital OutskirtsRegion.
Drops
16,800
Viridian Amber Medallion 1
HP
8,193 |